Chat Commands
Chat Commands are additional features that players can utilize to aid them in their journeys throughout Midgard. Chat Commands can be accessed by typing a "@" followed by a specific line of text into the chat box normally used to chat with other players. Listed below are all the available Chat Commands and how to use them.
Setting up Auto Commands
This special feature allows you to have any Chat Commands of your choosing be automatically set every time any character on your Master Account logs into the game.
To start setting this up you need to send a whisper message to a special NPC. In the bottom left most part of the chat box type NPC:AutoCommands as your whisper recipient, then enter any text to send to this NPC it's not important what you send.
![]()
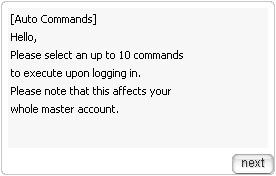
Upon sending any message a special configuration box will appear on your screen.

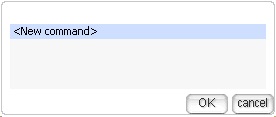
Simply follow the prompts and you'll be able to set a Chat Command to automatically activate every time you log in to the game.

![]()

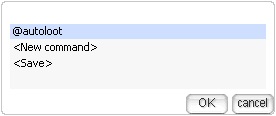
You can repeat this process to add up to 10 different Chat Commands but be sure to select the "Save" when you have added all the commands you want. All the commands you have entered will now be automatically enabled every time you log into the game. You can come back to this configuration screen at any time to further customize your Auto Commands.
Basic Commands
@commands
This will display a list showing all the available Chat Commands.
@help
Type any other command name following this command. Instructions on how to use that command will be displayed.
For example typing @help autotrade will display information on how the autotrade command works.
@rates
Displays all the various rates used on the server for Base experience, Job experience, Card drops, MVP drops, and more.
@exp
Displays your current Base and Job experience level and your percentages towards the next level.
@me
Type any message you like after the command. The message will then be visually displayed as if it were an action being performed by your character.
For example if a player named Fred was to type @me eats Cheese the message would then be displayed to other players as * :Fred eats Cheese: *
@noask
Typing this command will automatically decline any requests from other players to trade or party with you. Typing the command again will disable this effect.
@memo
Allows a character who knows the Warp Portal ability to set or change their memorized locations.
@noks
Enables or disables kill steal protection mode. This prevents other players outside of your party members from attacking enemies that you have in engaged combat.
@time
Displays the current real world time in the servers time zone.
@uptime
Displays how long the server has been online for since its' last reset.
@showexp
Enables or disables experience display. The amount of earned experience will be shown in the chat box each time you defeat enemies or complete quests.
Items: IDs, Buying, and Selling
@iteminfo or @ii
Type an items' name or ID number after the command. Detailed information of up to 5 items matching your entry will be displayed. This can be used to find information on any in game item.
@autotrade or @at
Allows a player with a personal shop currently open to log out of the game and continue vending without needing to keep an active connection to the game.
@whosells or @ws
Type an items' name or ID number after the command. A list of all players currently vending that item will be displayed along with information on the location of their stores.
Type a character name after the command. If that character is currently vending a guide line will lead you to that characters location.
Automatic Looting
@autoloot
When enabled loot dropped by defeated enemies will be automatically placed in the characters inventory instead of falling to the ground.
A number can be typed after this command to only automatically loot items below a specified drop chance.
@autoloottype
Choose which types of items you wish to autoloot. You can add or remove categories of items you wish to autoloot by using a + or - followed by the category of item.
Available categories include healing, usable, ect, weapon, armor, card, petegg, ammo
@alootid
Type the ID Numbers after a + for any specified item you wish your character to automatically loot.
For example the ID number for Red Herb is "507". Typing @alootid +507 will cause your character to automatically loot any Red Herbs that drop from defeated enemies.
If you later decide you no longer wish to automatically loot Red Herbs, you could type @alootid -507 to remove it from the list.
Alternatively if you've added several items to your alootid list you can remove all of them by typing @alootid reset
@arealoot
Enables or disables area looting mode. When you pick any item off the ground you will also pick up every other item within a 7x7 cell radius.
Mob Locations and Drops
@showrare
Enables or disables the display of chat notifications when you loot items below a specified drop rate or equipment with at least a specified number of options
Typing @showrare followed by a number will display notifications for loot below that drop chance. For example typing @showrare 5 will display notifications for any loot found with less than a 5% drop chance.
Typing @showrare 0 followed by a number will display notifications for loot drops with at least that many options. For example typing @showrare 0 3 will display notifications for any loot found with at least 3 options.
Both these modes can be combined. For example typing @showrare 5 3 will display notifications for any loot that has below a 5% drop chance and with at least 3 options.
@whereis
@whodrops
Chat Channels
@channel
@join
Dueling
@duel
Dueling allows you to engage in a PvP battle with another player. Typing this command will begin the process of creating a duel.
@invite
Type a character name after this command to send them a request to duel with you.
@leave
Leaves your duel.
@accept
Accept another players request to duel you.
@reject
Decline another players request to duel you.
