|
|
| (One intermediate revision by the same user not shown) |
| Line 30: |
Line 30: |
| | | | |
| | Check the [https://forum.playragnarokzero.com/index.php?/forum/26-acolyte-guild/ Acolyte Guild] section of the forums for Priest guides, made by the community for the community. | | Check the [https://forum.playragnarokzero.com/index.php?/forum/26-acolyte-guild/ Acolyte Guild] section of the forums for Priest guides, made by the community for the community. |
| − | <!--
| |
| − | == Builds ==
| |
| − | === Full Support ([[FS]])===
| |
| − | * '''STR:''' 1
| |
| − | * '''AGI:''' 1
| |
| − | * '''VIT:''' 80-95
| |
| − | * '''INT:''' 90-99
| |
| − | * '''DEX:''' 8-20
| |
| − | * '''LUK:''' 8-20
| |
| − |
| |
| − | As the name suggests, this is the most support-oriented build for Priests. The primary stat for FS is [[Stats#INT|INT]]. It gives the player a larger SP pool and higher SP regenate, which means they can cast more healing spells and buffs. They will want to take, and almost always maximize, the [[Magnificat]] skill to help with their SP regeneration. Maximizing INT also grants resistances to a few status effects. The second stat is [[Stats#VIT|VIT]]. It gives the player larger HP pools and higher DEF, which allows them to live longer and keep other players alive. As a FS Priest, a player does not want to die, as they cannot help the rest of their party when they're dead. Typically, the third most important stat is [[Stats#LUK|LUK]]. Most importantly for FS, higher LUK increases perfect dodge rates as well as grants a slew of resistances and gives additional [[Stats#MATK|MATK]] and [[Stats#|MDEF]]. [[Stats#DEX|DEX]] is usually the fourth stat for FS Priests, as it helps cut down on variable cast times, so the player can cast more spells more often. Some players will put less LUK and more DEX into their builds and vice versa, depending on personal preferences. Players can also take less VIT for more DEX or LUK, if they feel their survivability is high enough.
| |
| − |
| |
| − | The player will be primarily healbombing undead monsters or partying with others for leveling. If the player intends to solo for the majority of their playing time, it is not recommended to go with this build as undead-specific maps are hard to find and leveling slows down as the player increases in level. If the player wants to become a full-support Archbishop and finds themselves soloing often, a recommended route is to go with a Battle, Turn Undead, or Magnus Exorcismus build until they transcend and go with a full-support build after, as those builds have higher damage outputs and allow the player to gain more experience than healbombing undead alone.
| |
| − |
| |
| − | A FS Priest's main arsenal of skills include maximizing [[Resurrection]], buffs (namely [[Kyrie Eleison]], [[Gloria]], [[Magnificat]], [[Suffragium]], [[Aspersio]], [[Increase SP Recovery]], and [[Impositio Manus]]), and getting [[Status Recovery]], [[Lex Divina]], and [[Lex Aeterna]]. Some players like getting [[Sanctuary]] or [[Safety Wall]] as well.
| |
| − |
| |
| − | === Semi Support Solo Leveling Build ===
| |
| − | * '''STR:''' 1-40 (optional for more damage)
| |
| − | * '''AGI:''' 60-80
| |
| − | * '''VIT:''' 50-70
| |
| − | * '''INT:''' 80-90
| |
| − | * '''DEX:''' 40-60
| |
| − | * '''LUK:''' 1
| |
| − | This build is designed for players who need to level by themselves in the early stages. [[AGI]] provides [[ASPD|attack speed]] and some [[FLEE]], so this will allow players to quest and kill their way to a high level. Due to lower VIT / INT stat progression as the player invests in AGI early on, it is not as effective as a Full Support build in party situations in terms of support, but is still quite viable.
| |
| − |
| |
| − | === Exorcist ===
| |
| − | ==== [[Turn Undead]] (TU) Build ====
| |
| − | * '''STR:''' 1
| |
| − | * '''AGI:''' 1
| |
| − | * '''VIT:''' 60-80
| |
| − | * '''INT:''' 90-99
| |
| − | * '''DEX:''' 60-80
| |
| − | * '''LUK:''' 20-40
| |
| − | The TU-based build is often treated as a hybrid build. Most TU Priests double as Support due to the compatibility of stats and availability of support skill points. INT and LUK are the two stats that directly affect the success rate of instantly killing the [[Undead]] property targets with TU, and a must-have skill is [[Gloria]]. There is debate about the practicality of having any LUK at all (success rate difference of 2~3%), especially if the Priest is hybrid, in which case those extra points can be invested into either VIT or DEX.
| |
| − |
| |
| − | ==== [[Magnus Exorcismus]] (ME) Build ====
| |
| − | * '''STR:''' 1
| |
| − | * '''AGI:''' 1
| |
| − | * '''VIT:''' 60-80
| |
| − | * '''INT:''' 90-99
| |
| − | * '''DEX:''' 60-80
| |
| − | * '''LUK:''' 20-40
| |
| − | The only reliable AoE skill a Priest has. The main concern of ME-based build is the [[MATK]] and Cast Time. Players will use Level 10 [[Safety Wall]] and [[Lex Aeterna]] to mass kill [[Undead]] and [[Demon]] monsters through the use of [[Magnus Exorcismus]]. ME Priests can also effectively instantly kill [[Undead]] by using their Level 1 [[Resurrection]], which is ranged and has no Cast Delay (but still consumes a {{item |id=717 Blue Gemstone}}). Note: Magnus Exorcismus now damages all monsters.
| |
| − |
| |
| − | === Battle Priest ===
| |
| − | This is the [[Melee]] combat version of the Priest class. This build is effective against fighting [[Undead]] and [[Demon]] monsters, is very self sufficient, and also can be very fun to play. Unfortunately, it suffers from no [[Area of Effect|area]] skills which limit it to single target killing. Battle Priests are still capable of semi/secondary-party support due to [[Sanctuary]] not relying on INT for amount healed, as well as the party buffs available, but by no means can compete with a Full Support build when it comes to support and cannot be relied on to support a full party on its own. It is usually recommended not to go full Battle Priest, and go with a hybrid Battle + Support build as it is extremely hard or slow to level a Priest solo in the later levels without an AoE skill.
| |
| − |
| |
| − | This build has the following variations:
| |
| − |
| |
| − | ==== Strength ====
| |
| − | * '''STR:''' 60-80
| |
| − | * '''AGI:''' 70-90
| |
| − | * '''VIT:''' 50-80
| |
| − | * '''INT:''' 40-60
| |
| − | * '''DEX:''' 40-60
| |
| − | * '''LUK:''' 20-40
| |
| − | Quite effective at leveling to a high level with nothing but [[Eden Group Equipments Quests|Eden gear]] on and using little to no [[Healing Items|healing items]]. This build is capable of self buffs, self healing, and self warping for quick transportation. Medium to Medium-High INT is still recommended for maximum efficiency in heals and buffs. A {{item |id=1522 Stunner}} may be the best weapon option for this build due to the chance of [[Status Effects#Stun|stunning]], but an {{item |id=16014 Eden Group Mace III}} is just as efficient.
| |
| − |
| |
| − | ==== Critical ====
| |
| − | * '''STR:''' 60-80
| |
| − | * '''AGI:''' 70-90
| |
| − | * '''VIT:''' 50-80
| |
| − | * '''INT:''' 40-60
| |
| − | * '''DEX:''' 20~40 (just for leveling up early on, near 100% [[CRIT]] builds do not need HIT, so low DEX is fine)
| |
| − | * '''LUK:''' 60+
| |
| − | This build can be '''very''' expensive, but can out-DPS the Strength build due to consistent Critical Hits, which never miss and hit harder than regular hits. With [[autocast]]s, the player can increase their damage output even further.
| |
| − | -->
| |
| | | | |
| | == Tactics == | | == Tactics == |
| Line 127: |
Line 60: |
| | * '''[[Status Recovery]]''' and '''[[Cure]]''': Priests must pay attention to the [[Status Effects]] inflicted on their party members and should use the two skills on them accordingly. | | * '''[[Status Recovery]]''' and '''[[Cure]]''': Priests must pay attention to the [[Status Effects]] inflicted on their party members and should use the two skills on them accordingly. |
| | * '''[[Sanctuary]]''': This spell has great healing power for a low SP cost (but uses a {{item |id=717 Blue Gemstone}}). Highly recommended to have this skill at Level 7, as that already provides the maximum healing power already. Level 8~10 only increases its duration. | | * '''[[Sanctuary]]''': This spell has great healing power for a low SP cost (but uses a {{item |id=717 Blue Gemstone}}). Highly recommended to have this skill at Level 7, as that already provides the maximum healing power already. Level 8~10 only increases its duration. |
| − |
| |
| − | == Equipment ==
| |
| − |
| |
| − | === Kingdom Guild Equipments Quests ===
| |
| − |
| |
| − | :''Main article: [[Kingdom Guild]]''
| |
| − |
| |
| − | Kingdom Guild Equipment is a great series of starter equipment. All items have 1 slot, carry different bonuses, and are enchantable.
| |
| | | | |
| | == Class Data == | | == Class Data == |
| Priest
|

|
| Job Base(s): |
Acolyte
|
| Job Type: |
2-1
|
| Race: |
Human
|
| Changes At: |
Prontera Church
|
| Number of Skills: |
34
|
| Total Skill Points: |
198
|
| Total Quest Skills: |
2
|
| Job Bonuses
|
| STR |
AGI |
VIT |
INT |
DEX |
LUK
|
| +5 |
+4 |
+5 |
+5 |
+4 |
+7
|
|
Overview
Acolytes who are successful in honing their spiritual powers and enhancing their contracts with the divine are promoted to Priests. Priests have an enhanced repertoire of divine spells that improves their allies or their own abilities to fight and banish the evils with exorcism spells. Priests are an essential support class to any venturing party, once the Priest dies, the rest may more or less follow.
Priests are one of the few classes who will be using numerous skills in battle, and must be flexible in any situation, advancing from acolytes it is easier for them to support larger parties but this would still drain the spiritual energy of the Priest. Having more spells to cast, it is up to the Priest which to prioritize first, with a main goal to keep the party up and going. Priest roles can range from going Full Support, or going all out with exorcising the Demons and Undead or just be a self sufficient killing machine. The support role however is always a part of the priest whichever path the priest would decide upon.
Priests are able to use books as a weapon, but more or less Priests would still stick to using either a Rod/Staff or a Mace. INT is still one of the most important stats in order to have a large SP pool and better SP recovery rates to keep using spells. STR will be the option for priests who would prefer to wield Maces in battle and do the killing themselves.
Job Change Guide
Requirement: Acolyte base 50 and job 50
See Priest Job Change Guide for detailed information.
Guides
Check the Acolyte Guild section of the forums for Priest guides, made by the community for the community.
Tactics
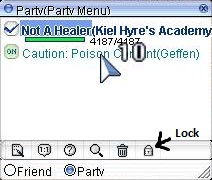
The most effective way to heal and buff a party is through the Party Window (Alt+Z). Trying to heal a party by manually clicking players can become impossible when players become mobbed or are bunched up, and can lead to players dying. This is why it is strongly recommended to make use of the Party Window. Another benefit to the Party Window is the ability to monitor all players' health. Ensure that the "Lock Menu" feature is on (by clicking the picture of the lock) when using this system to avoid opening private messages when trying to heal / buff a player.
SP Recovery & Conservation
One of the biggest issues new Priests have when playing the class is maintaining their SP. There are many ways for Priests to ensure that they always have SP for those dire situations. These are some important methods on maintaining SP:
- Always ensure that Magnificat is on at all times. This skill will not only keep a faster SP Recovery for the Priest, but also for the rest of the party that rely on SP for using skills as well. Keeping this buff up will make parties much smoother for everybody. Try not to wait until SP is bottoming out to cast this spell, because at that point it will already be too late.
- Get Increase SP Recovery. It grants the player additional natural SP regeneration. If the player cannot naturally regenerate SP (such as when carrying 50%+ weight capacity), the SP recovery will not continue until the player can resume natural regeneration.
- Stack SP Recovery or Max SP increase equipment. Gearing a Priest up with equipment that will increase their SP Recovery or Max SP will vastly help a player to maintain SP at all times.
- Always have Healing Items (SP) on hand. All players should have SP healing items on hand at all times to restore SP, at least in emergencies, and this includes Priests as well. As most classes should have HP healing items of some sort on them at all times, Priests should also have SP healing items on them.
- Sitting. Sitting helps to regenerate HP/SP quickly, so if the player needs to get a small boost of SP quickly, it may be worth it to sit briefly, even in combat. Note: There is an animation delay between sitting and standing back up. Be careful if using this method while in combat as the player can still be hit.
Some common items that can be easily obtained for SP regeneration include:
Skill Tips
Priests should remember that Lex Aeterna loses its rather long Cast Delay if used under the effect of Magic Strings, to the point when it can be constantly casted. This is a great way to double the damage output of parties, especially in single target situations such as MVPs.
Some skills in the Priests' arsenal may not serve a strong use while still leveling as a Priest, but many may have uses in MVP situations or other specific scenarios. These should be hotkeyed as well, and often a Priest will have all four rows of hotkeys used up. Some of these include:
- Pneuma: A very powerful and necessary skill when fighting ranged monsters within a party. Certain ranged monsters and skills are very powerful and this spell can save players a lot of stress. Make sure the party members are positioned correctly. Nine people can actually fit into one Pneuma's area.
- Aspersio: This skill endows a party member's weapon with the Holy property, which will greatly improve a party member's physical damage when the monsters are weak to the Holy property.
- Status Recovery and Cure: Priests must pay attention to the Status Effects inflicted on their party members and should use the two skills on them accordingly.
- Sanctuary: This spell has great healing power for a low SP cost (but uses a Blue Gemstone). Highly recommended to have this skill at Level 7, as that already provides the maximum healing power already. Level 8~10 only increases its duration.
Class Data
Skills
- See Acolyte Skills for first class Skills.
| Skill |
Description |
Levels |
Type
|
|
|
Endows the user or party member's weapon with Holy property for 60~180 seconds. Requires a Holy Water.
|
5
|
Supportive
|
|
|
Endows the armor of all targets with Holy property, in a 3x3 area around the targeted location for 40~200 seconds. Requires two other Acolyte-class characters horizontally adjacent to the caster.
|
5
|
Supportive
|
|
|
Increases LUK of the user and all party members nearby by 30 for 10~30 seconds.
|
5
|
Supportive
|
|
|
Increases ATK and MATK of the party by 5~25 for 120 seconds.
|
5
|
Supportive
|
|
|
Grants additional SP Recovery while not moving. Also increases efficiency of Healing Items (SP) and Alchemist's Aid Potion by 10~100%.
|
10
|
Passive
|
|
|
Creates a magic barrier on a single target that blocks physical attacks for either 120 seconds, until 5~10 hits are blocked or until its durability (12~30% of target's Max HP) wears off.
|
10
|
Supportive
|
|
|
Doubles the damage of the next attack against a single target.
|
1
|
Supportive
|
|
|
Attempts to silence a target for 30~60 seconds.
|
10
|
Supportive
|
|
|
Increases ATK by 3~30 with maces.
|
10
|
Passive
|
|
|
Doubles the SP Recovery rate of the user and all party members nearby for 30~90 seconds.
|
5
|
Supportive
|
|
|
Summons a holy cross on the targeted location that inflicts 1~10 hits at 3-second intervals, each for MATK 100% damage to all monsters not of the Holy element, and deals an additional 30% more damage to Demon, Undead, Shadow, and Ghost property monsters in a 7x7 area, for 5~14 seconds. Requires a Blue Gemstone.
|
10
|
Offensive
|
|
|
Resurrects a dead player with 10~80% of its Max HP restored. Requires a Blue Gemstone.
|
4
|
Supportive
|
|
|
Creates a pink light pillar on a targeted cell that protects from melee attacks, for either 5~50 seconds or until its durability wears off. Requires a Blue Gemstone
|
10
|
Supportive
|
|
|
Enchants a targeted location with restorative powers for 4~31 seconds, recovering 100~777 HP to 4~13 players in a 5x5 area. Requires a Blue Gemstone.
|
10
|
Supportive
|
|
|
Halts the HP draining effects of the Poison status for 10~40 seconds.
|
4
|
Supportive
|
|
|
Cures a target from Frozen, Stone, Sleep and Stun statuses.
|
1
|
Supportive
|
|
|
Shortens the Variable Cast Time of the caster and their party members for the entire duration of the skill by 10/15/20%.
|
3
|
Supportive
|
|
|
Attempts to obliterate the targeted Undead property monster.
|
10
|
Offensive
|
Quest Skills
| Skill |
Description |
Levels |
Type |
Job Level Req. |
Quest
|
|
|
Resurrects all dead party members within a 15x15 area around the user with half of their Max HP restored.
|
1
|
Supportive
|
40
|
Redemptio Quest
|
Job Bonuses
| Stat\Amount |
+1 |
+2 |
+3 |
+4 |
+5 |
+6 |
+7
|
| STR
|
4 |
11 |
17 |
27 |
35 |
|
|
| AGI
|
6 |
29 |
37 |
48 |
|
|
|
| VIT
|
7 |
14 |
34 |
36 |
45 |
|
|
| INT
|
8 |
9 |
22 |
42 |
43 |
|
|
| DEX
|
16 |
20 |
25 |
32 |
|
|
|
| LUK
|
1 |
3 |
10 |
21 |
31 |
39 |
50
|
ASPD
External Links


 Strawberry: Easily farmed off Spores or Yoyos, or bought from Vendors.
 Blue Potion: Can be brewed by Alchemists or purchased from Vendors.
 Blue Herb: Can be farmed off Blue Plants for high drop rate. Alchemists can be use them to brew Blue Potions.
 Grape Juice: Farmed off Dragon Flies (rare monsters). Can also be made with the Juice Quest.
 Orange: Farmed off Baby Desert Wolves, Peco Pecos, Condors, etc.